Automatic Cat Laser Pointer Toy Using the Raspberry Pi
May 11, 2018
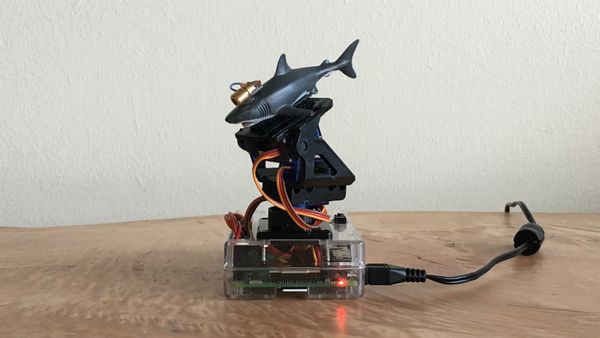
Living in the city has shown me just how hard it can be to find an affordable apartment with a reasonable amount of space. Having two cats in such a small place doesn't really give them much room to roam or pseudo hunt. Inspired by this cat tower, I decided to build an automatic cat laser pointer toy using my Raspberry Pi. The cats had one condition though, that it be a shark with a frikin' laser beam attached to its heads (sound warning!).
If you've come across my automatic cat feeder post you might be thinking I'm automating myself out of the equation. Fear not, for we are still their primary source of entertainment, as they are ours.
Goal
The goal may be obvious at this point, but I like being explicit: to build an automatic cat laser pointer toy that is configurable, and can be triggered by a button.
Bonus Goal: configure and trigger this remotely. We'll focus on the simpler solution first, and optionally over-engineer the project later on.
Prerequisites
You should have a configured Raspberry Pi ready to go. I used my Raspberry Pi 3B (40 GPIO pins), a 32gb MicroSD card (you could certainly go smaller) and the Raspbian distro (highly recommended). This guide was pretty straightforward and got me up and running in no time.
The Parts
As with my automatic cat feeder post, I decided to break this down into four distinct parts:
- Here in part one we're introducing the project and what you'll need to get it done.
- In part two we'll assemble all the pieces of the cat laser pointer toy.
- Part three will focus on writing the python code, which will be responsible for moving the servo motors and turning on the laser beam at the push of a button.
- Part four will cover the bonus goal of configuring and triggering remotely [optional].
Things You'll Need for the Automatic Cat Laser Pointer Toy
- Pan/tilt camera mount with 2x servos for controlling the movement of the laser.
- 1x Laser diode to take over the world with.
- 6x male-to-female, 6x any-to-female jumper wires to connect everything to the GPIO pins. What I mean by "any" here is that "it doesn't matter", because we'll be cutting off that end of the wire and soldering it anyway.
- 1x NPN Transistor to logically control the Pi's 3v3 power rail through a GPIO pin, and toggle the laser on/ off. You only need one of these. eBay may have better options in terms of quantity, or hey, even stop at a physical store!
- SHARKS! because it really is hilarious.
- 5v 2.5A power supply to power the Pi, servos and lasers. The servos and laser draw a good amount of current, so we need to make sure the power supply is capable of supporting it.
- Raspberry Pi Case to house the Pi and wiring. This isn't strictly necessary, but it made for a convenient way to mount the laser and control the wiring.
- 1x Push Button to manually engage the laser.
- Velcro to mount the shark (or laser if you opted out of adding a shark, which saddens me) to the pan/tilt mount. I used velcro here so I can conveniently point the laser in the opposite direction, which provides an entirely different available range for the pan/tilt mount.
- Electrical tape to wrap the soldered wires.
The Tools
- [Optional] Power drill to make holes in the Raspberry Pi case to fasten the pan/tilt mount to it. If I did this project over, I would have used
velcroas my fastener as it's much simpler and less intrusive. Your call. - Hot glue gun to glue the laser to the shark. Again, any other adhesive would suffice if you don't already have a hot glue gun.
- Soldering iron to solder some of the wiring together.
- Wire stripper for when we get to stripping and soldering a few of the wires.
- Tiny philips screwdriver to assemble the pan/tilt mount.
Conclusion and Next Steps
At this point we covered the basics of what it is we're trying to build here in part one, and what you'll need to accomplish it. Head over to part two where we'll be focusing on assembling all the pieces.
Ahead of the game? Nice! Part three has the Python code, and part four sets up a way to remotely control the whole thing.


Comments
Leave a Comment