Setting Opacity of Android Toolbar Overlay Based on ViewPager Position
Dec 9, 2017
I've recently delved into the world of mobile development using Xamarin with Visual Studio. A tutorial on their website introduced me to the Android toolbar, and how it can be used as a more robust and flexible action bar. This was fairly straightforward to implement but I had a requirement that the toolbar overlay shouldn't be visible on certain fragments of a ViewPager.
The Goal
What were trying to achieve here is a way to change the opacity of the toolbar overlay based on the ViewPager's current position and offset. As paging occurs, the toolbar should become more or less transparent depending on the fragment we're paging to. Here's an example of what I mean:

The above is what we'll be covering in this post. Here's some additional resources that helped get me to this point. These go a bit more in depth in their respective areas and will prove useful in case anything here isn't quite detailed enough:
- Using ViewPager for Screen Slides
- Replacing the action bar with Toolbar
- Creating a transparent toolbar overlay (video)
The full solution has been added to my GitHub repository as well. Get to forking!
Let's get to it!
Prerequisites
Before getting started you'll need to create a new Xamarin Android project in Visual Studio. You'll also need to add the v13 and v4 Android Support libraries as references.
While this post is targeted toward Xamarin for Visual Studio, the majority of its content is very translatable to Xamarin and Android Studio
In Visual Studio, adding the support libraries can be done via the NuGet Package Manager:
- Navigate to
Tools -> NuGet Package Manager -> Manage NuGet Packages for this Solution... - Click the
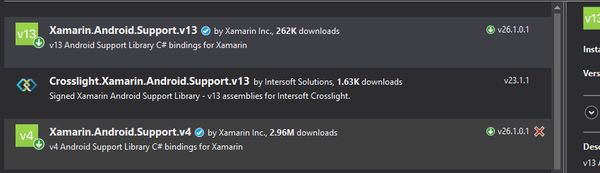
Browsewindow, then search forXamarin.Android.Support.v13 - In the resulting window, install both
Xamarin.Android.Support.v13andXamarin.Android.Support.v4libraries
Adding the ViewPager and Fragment Layouts
We'll start by creating the ViewPager and its accompanying fragments which will enable that smooth swiping transition between the fragment views. This requires that we create a couple new fragments to be used by the ViewPager control, and add the ViewPager itself to the Main.axml layout.
Under the Resources -> layout folder of your project let's modify Main.axml and add a couple new layouts:
Modify the Main Layout
This is the starting view of our activity and will encompass our toolbar overlay and the ViewPager. For now we're just going to focus on adding the ViewPager. We'll circle back to adding the toolbar overlay to this layout once we've built it.
Double-click the Main.axml layout file to edit it. The layout will likely open in the visual designer so you'll want to click the Source button at the bottom left of the designer, then paste the following:
<?xml version="1.0" encoding="utf-8"?>

<RelativeLayout xmlns:android="http://schemas.android.com/apk/res/android"
  android:layout_width="match_parent"
  android:layout_height="match_parent">
    <android.support.v4.view.ViewPager
      android:id="@+id/viewPager"
      android:layout_width="fill_parent"
      android:layout_height="fill_parent" />
</RelativeLayout>
Add the FragmentOne Layout
This layout will be the one where we don't want the toolbar overlay to be visible, allowing the view itself to utilize the screen in its entirety. An example of where this might be handy is when showing a live camera stream in the view; you wouldn't want the toolbar overlay to take precious real-estate.
Add a new layout file called FragmentOne under the Resources -> layout folder with the following inside:
<?xml version="1.0" encoding="utf-8"?>
<RelativeLayout xmlns:android="http://schemas.android.com/apk/res/android"
  android:layout_width="fill_parent"
  android:layout_height="fill_parent"
  android:background="#CCC">
    <TextView
      android:layout_width="wrap_content"
      android:layout_height="wrap_content"
      android:text="This view should HIDE the toolbar."
      android:textColor="#000"
      android:textSize="14dp"
      android:layout_centerHorizontal="true" />
</RelativeLayout>
Add the FragmentTwo Layout
This layout will embrace the toolbar overlay. Since the toolbar will indeed be an overlay (that is, it's floating on top of other content, rather than pushing other content below), we'll need to force the view's content to begin below the toolbar. This can be achieved in a number of ways, but for this example we're just adding padding to the top of the fragment.
Add a new layout file called FragmentTwo under the Resources -> layout folder with the following inside:
<?xml version="1.0" encoding="utf-8"?>
<LinearLayout xmlns:android="http://schemas.android.com/apk/res/android"
  android:layout_width="match_parent"
  android:layout_height="match_parent"
  android:background="#FFF"
  android:paddingTop="?android:attr/actionBarSize">
  <TextView
    android:layout_width="wrap_content"
    android:layout_height="wrap_content"
    android:text="This view should SHOW the toolbar."
    android:textColor="#000"
    android:textSize="14dp"
    android:padding="5dp"
    android:layout_centerHorizontal="true" />
</LinearLayout>
Implement the FragmentPagerAdapter for the ViewPager
At this point we have the fragment layouts for our ViewPager in place and the ViewPager itself added to the main layout. Now we need to implement a FragmentPagerAdapter for our ViewPager so it knows about our fragments, and how to view them.
Create the ViewPageFragmentAdapter Class
As I mentioned, the ViewPager control requires a concrete implementation of the FragmentPagerAdapter so it knows how to handle paging. In your project, add a new class called ViewPageFragmentAdapter with the following:
 public class ViewPageFragmentAdapter : FragmentPagerAdapter {
    public ViewPageFragmentAdapter(FragmentManager fragmentManager, List fragments) : base(fragmentManager) {
        this.fragments = fragments;
    }

    private readonly List fragments;

    public override int Count => fragments.Count;

    public override Fragment GetItem(int position) {
        if (position < 0) {
            position = 0;
        }

        if (position >= Count) {
            position = Count - 1;
        }

        return fragments[position];
    }
 }
To resolve the missing reference error you're seeing on the FragmentPagerAdapter, add the using statement using Android.Support.Android.V13.App;.
Modify the MainActivity Class
Our MainActivity class needs to be updated to do the following:
- Grab a reference to our ViewPager
- Implement the ViewPager.IOnPageChangeListener interface, which is responsible for handling ViewPager paging and will eventually be where we set the opacity of our toolbar overlay
- Set the
ViewPageFragmentAdapteras the official adapter of our ViewPager.
Modify your MainActivity class to look as follows:
[Activity(Label = "ToolbarOverlay", MainLauncher = true)]
public class MainActivity : Activity, ViewPager.IOnPageChangeListener {
    public void OnPageScrolled(int position, float positionOffset, int positionOffsetPixels) {
    }

    public void OnPageScrollStateChanged(int state) {
    }

    public void OnPageSelected(int position) {
    }

    private ViewPager viewPager;
    protected override void OnCreate(Bundle savedInstanceState) {
        base.OnCreate(savedInstanceState);

        // Set our view from the "main" layout resource
        SetContentView(Resource.Layout.Main);

        var fragments = new List {
            new FragmentOne(),
            new FragmentTwo(),
        };

        viewPager = FindViewById(Resource.Id.viewPager);
        viewPager.Adapter = new ViewPageFragmentAdapter(FragmentManager, fragments);
        viewPager.AddOnPageChangeListener(this);
    }

}
To resolve the reference error you're seeing on ViewPager.IOnPageChangeListener, add the using statement using Android.Support.V4.View.
At this point we've created a ViewPager, a couple fragments for it to page through and implemented the necessary code to teach the pager how to page. With all that in place we should have a fully functional pager, but the default action bar is still visible. Let's replace it with our custom toolbar overlay!
Replacing the Default Action Bar with a Toolbar Overlay
I mentioned it before, but this guide on Xamarin's website helped walk me through how to replace the action bar with a custom toolbar. We'll more or less be following its implementation with a few adjustments.
Create a Custom Theme to Disable the Action Bar
Before we can use our custom toolbar overlay, we need to disable the default action bar. Disabling the action bar can be done by implementing a custom theme. In your project under the Resources -> values folder, add a new XML file called styles.xml with the following:
<?xml version="1.0" encoding="utf-8" ?>
<resources>
  <style name="StoriKnowTheme" parent="@android:style/Theme.Material.Light.DarkActionBar">
    <item name="android:windowNoTitle">true</item>
    <item name="android:windowActionBar">false</item>
    <item name="android:colorPrimary">#5A8622</item>
  </style>
</resources>
That wasn't too bad, but we still need to set this as the theme in the the Android App Manifest file before our application starts using it. In your project, open the AndroidManifest.xml file under the Properties tree and add the android:theme="@style/StoriKnowTheme" attribute to the application node. Here's what mine looks like:
<?xml version="1.0" encoding="utf-8"?>
<manifest xmlns:android="http://schemas.android.com/apk/res/android"
          package="ToolbarOverlay.ToolbarOverlay"
          android:versionCode="1"
          android:versionName="1.0">
  <uses-sdk android:minSdkVersion="21" />
  <application android:theme="@style/StoriKnowTheme" android:allowBackup="true" android:label="@string/app_name">
  </application>
</manifest>
Create the Page Aware Custom Toolbar Overlay
We're almost there! At this point we just need to:
- Create the custom toolbar overlay layout
- Add this layout to the
Main.axmlfile - Set the opacity as we swipe between pages
Under the Resources -> layout folder, add a new layout called Toolbar with the following:
<?xml version="1.0" encoding="utf-8"?>
<Toolbar xmlns:android="http://schemas.android.com/apk/res/android"
    android:id="@+id/toolbar"
    android:layout_width="match_parent"
    android:layout_height="wrap_content"
    android:minHeight="?android:attr/actionBarSize"/>
Now open up the Main layout under Resources -> layout and include the toolbar overlay you just created (that's line 11 below):
<?xml version="1.0" encoding="utf-8"?>

<RelativeLayout xmlns:android="http://schemas.android.com/apk/res/android"
  android:layout_width="match_parent"
  android:layout_height="match_parent">
    <android.support.v4.view.ViewPager
      android:id="@+id/viewPager"
      android:layout_width="fill_parent"
      android:layout_height="fill_parent" />
  <include android:id="@+id/toolbar" layout="@layout/Toolbar" />
</RelativeLayout>
Great, Main.axml knows about the toolbar now, but we still need to tell the main activity that this is actually the new action bar. Along with that, we want to set the opacity of the toolbar overlay as we change pages.
Use the Toolbar as an Action Bar and Set its Opacity During Paging
To wrap things up, let's modify the MainActivity one last time using the highlighted rows as a visual guide to what changed:
[Activity(Label = "ToolbarOverlay", MainLauncher = true)]
public class MainActivity : Activity, ViewPager.IOnPageChangeListener {
    private ViewPager viewPager;
    private Toolbar toolbar;

    public void OnPageScrolled(int position, float positionOffset, int positionOffsetPixels) {
        var opacity = 1.0;
        int toolbarTranslationZ = 100;
        int viewPagerTranslationZ = 99;
        if (position == 0) {
            if (positionOffset == 0) {
                //  position and positionOffset of 0 means we're on the first fragment, which should
                //  have the viewpager on top of the toolbar, so we set the z-index of the toolbar
                //  to be slightly less than the view pager.
                toolbarTranslationZ = 99;
                viewPagerTranslationZ = 100;
            }

            opacity = positionOffset;
        }

        //  the first parameter of the Color.Argb method is what sets the opacity level
        toolbar.SetBackgroundColor(Color.Argb((int)(opacity * 255), 200, 84, 59));
        toolbar.SetTitleTextColor(Color.Argb((int)(opacity * 255), 255, 255, 255));

        //  just setting the opacity will hide the toolbar, but we'll also set its
        //  z-index for good measure, and to guarantee it doesn't intercept touch events
        //  while it's invisible.
        ViewCompat.SetTranslationZ(viewPager, viewPagerTranslationZ);
        ViewCompat.SetTranslationZ(toolbar, toolbarTranslationZ);
    }

    public void OnPageScrollStateChanged(int state) {
    }

    public void OnPageSelected(int position) {
    }

    protected override void OnCreate(Bundle savedInstanceState) {
        base.OnCreate(savedInstanceState);

        // Set our view from the "main" layout resource
        SetContentView(Resource.Layout.Main);

        var fragments = new List {
            new FragmentOne(),
            new FragmentTwo(),
        };

        toolbar = FindViewById(Resource.Id.toolbar);
        SetActionBar(toolbar);
        ActionBar.Title = "StoriKnow Toolbar";

        viewPager = FindViewById(Resource.Id.viewPager);
        viewPager.Adapter = new ViewPageFragmentAdapter(FragmentManager, fragments);
        viewPager.AddOnPageChangeListener(this);
    }

    public class ViewPageFragmentAdapter : FragmentPagerAdapter {
        public ViewPageFragmentAdapter(FragmentManager fragmentManager, List fragments) : base(fragmentManager) {
            this.fragments = fragments;
        }

        private readonly List fragments;

        public override int Count => fragments.Count;

        public override Fragment GetItem(int position) {
            if (position < 0) {
                position = 0;
            }

            if (position >= Count) {
                position = Count - 1;
            }

            return fragments[position];
        }
    }
}
Conclusion
There you have it, we've successfully utilized a custom toolbar overlay on a view pager and tied its opacity level to the current pages position and offset.


Comments
Leave a Comment