Automatic Cat Feeder Using the Raspberry Pi
Sep 16, 2017
After many failed attempts at changing their feeding schedule, our cats are starving by 3:00 AM. What this equates to is many meows until we're awake. I remembered a post I saw on David Bryan's blog about his Raspberry Pi controlled automatic cat feeder. Inspired by David, I decided to take a crack at building my own. Here's what I came up with, and what I'll be covering in this post.
Goal
An automated way to feed the cats both on demand as well as on a schedule.
This cat feeder will be triggered by email. More specifically, Gmail. That's right, we're going to set up a Gmail account that our Raspberry Pi will monitor. When an email arrives with the expected subject, the cat feeder will let loose its goods.
I chose this route to avoid overly complicating the project. Feeding the cats on demand is as easy as sending an email, while feeding them on a schedule is as easy as creating an IFTTT applet. So long as the cats don't figure out the email account and secret subject, this should be a viable solution.
If you find this series of posts interesting, you might also enjoy the automatic cat laser pointer toy series!
Prerequisites
You should have a configured Raspberry Pi ready to go. I used my original Raspberry Pi Model B (26 GPIO pins), an 8gb SD card and the Raspbian distro (highly recommended). This guide was pretty straightforward and got me up and running in no time.
The Parts
I decided to break this post down into distinct parts for readability:
- Here in part one we're introducing what we're building and the things you'll need to get it done
- Part two will cover writing code to interrogate your Gmail account for an email with the subject feed cats
- Meanwhile, part three is going to focus on connecting your servo motor to the Raspberry Pi and writing code to make it spin
- And lastly, part four will cover my approach at mounting the Pi and servo motor to the dispenser
The Things You'll Need for the Automatic Cat Feeder
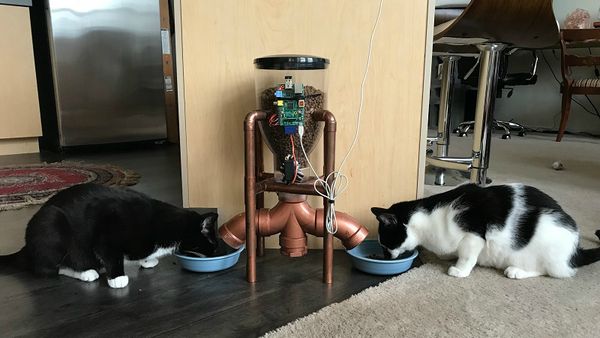
- Cereal/ Dry Food Dispenser to hold the cat food. The stand this dispenser came with didn't have sufficient space to mount the motor on the back end. I wanted the motor to be hidden as much as possible, so this drove me to build my own stand for the dispenser.
- Servo motor to spin the dispenser. I used this continuous rotation servo motor, though the standard non-continuous servo motor will work just the same, as we won't be doing a full revolution.
- 5V 2A USB Power Adapter to power the Pi and motor. The motor draws a good amount of current, so we need to make sure the power supply is capable of supporting it. I ended up using my iPad charger.
- 3x Male-to Female jumper cables to connect the motor to the Pi's GPIO pins.
- WiFi Dongle, unless you'll be hard wiring or have a later Raspberry Pi model that comes with the WiFi built in (good on you).
- I have two cats, so I used a PVC fitting that will split the load into two bowls. Ideally, a 2 inch PVC Double 90 Degree Elbow. They don't sell them in stores around me, so I settled on the double wye and plugged the center hole.
- Zip ties, or some other cheap and easy fastener.
- 1x #8-32 Threaded Rod to fasten the base of the servo motor to the dispenser, keeping it from spinning.
- 4x #8-32 Hex Nut to tighten the rod in place.
The Tools
- Power drill if you plan on attaching the Pi and PVC pipe directly to the dispenser.
- Box cutter if you're using the threaded rods as a fastener, as they're slightly too large to fit in the servo motor mounting holes.
- Hacksaw if you're going to use the threaded rod from above. It's a bit too long so we'll need to shorten it.
[Optional] Building a Custom Stand for the Dispenser
The stand that came with the dispenser didn't have enough space behind it for the servo motor to be mounted properly. I wasn't keen on the idea of the servo being up front, especially knowing my cats with wires, so I went the route of building my own.
I chose to build this using copper piping (had to match our boho theme). It didn't take long to find something on Pinterest that (mostly) fit our needs. This plant holder was re-purposed to be a dry food dispenser stand. The small square in the middle was sized to fit the base of the dispenser firmly, then copper piping was built around it.
I'm not going to go into the specifics of how this was constructed, but here's a list of additional parts anyway:
- 3/4 inch copper pipe, around 7 to 10 feet total
- 4x 3/4 inch 90 degree copper elbows
- 8x 3/4 inch copper tees
- Copper pipe cutter
- J.B. Weld for welding the pipe connections together
Conclusion and Next Steps
So far we talked about what you'll need to get started. Head over to part two where we cover writing a python script to read your Gmail account using the IMAPClient library.
Ahead of the game? Part three covers rotating the servo motor, and part four is all about connecting the Pi and motor to the dispenser.


Comments
Leave a Comment
Tedd Johnson
January 9, 2018 at 5:55:05 PM UTC
Hey Sam, hopefully you see this:
The food dispenser you link (https://www.amazon.com/gp/B00013K8O4/) only holds 17 OZ and says it dispenses 1oz per twist, but the one in your picture seems much bigger. My two cats combined eat ~16 OZ of food a day, so I’m wondering if there’s something I’m missing?
Sam Storino
January 10, 2018 at 8:01:23 AM UTC
Hi Tedd,
The linked dispenser is indeed the one I purchased (though it looks as if they’re out of stock for the black one at the moment). We primarily feed our cats wet food during the day, and dry food via the automated feeder as a midnight snack. With that said, our cats each get about a quarter cup of dry food per day (~2 oz). If you calculate that out with 17.5 oz max in mind, we would have an empty dispenser every 8-9 days. That is not the case: I can’t give an exact, but I’d estimate we have to refill it once or twice a month at that rate.
I think the website measurements are a bit misleading: for example, a box of cereal may have a net weight of 12.5 oz and fill the dispenser to the brim, while the same net weight of something denser, like dry food, would only fill a fraction of the space.
I hope this was helpful, and thanks for reaching out! Let me know if you have any other questions.
Jo D
January 26, 2018 at 7:35:29 PM UTC
Hey Sam this looks great I have a pi and have tried my hands at 4 different projects with no success… I hope you can help me make this my first good pi project… Question if I use a breadboard could I connect jumper cables to the board and then the motor to the board as well? what would that look like and would I need to edit the code at all?
Sam Storino
January 27, 2018 at 11:48:23 AM UTC
Hey there Jo,
You could certainly use a breadboard, they simply break out the Pi’s connectors to a larger board, and they’re great for prototyping. With that said, it’s absolutely not necessary for this project and would add another piece for you to manage/ hook up to the feeder.
Any time I follow a guide I work through it start to finish. This tutorial is pretty comprehensive – I put a lot of energy into trying to make it as easy to follow as I could, more energy than I’d be able to provide here through comments.
My advice: take small, manageable steps toward completion. Don’t think of the project as a whole, break it down into little pieces that have a finite start and finish. Things you can wrap your mind around. For example, I started by hooking up the motor to the Pi and writing a small piece of code to make it spin. I had no idea how to do this, so I read as much as I could until I understood enough to get it going. That’s a good feeling and gave me a sense of accomplishment. From there, I worked on another piece of code that could read my Gmail, also a good feeling. Once I had that figured out I added on the ability to mark an email as “read”. All of these things by themselves are small, manageable items with a clear cut goal. Each of these items progressed the project forward; once you have them in place, it becomes pretty trivial to spin the motor through email. You’re unstoppable at that point.
P.s. I’m glad to hear you haven’t been discouraged by the previous four projects. Reading complete guides like this one can put on the illusion that the author has it all “figured out”. That’s never the case, everyone gets stuck, you just have to push through it. Eventually the hard work will pay off!
Chad
February 27, 2018 at 3:20:46 PM UTC
Looking at building this. We feed our cats only dry food twice a day. How do you determine how long the servo runs so I can make sure the cats get enough food at each feeding time?
Jean Pearl Ortinez
March 1, 2018 at 5:02:31 AM UTC
Hi sam I’m a student I’m having trouble making this project. Do you have a video tutorial for this?
Sam Storino
March 5, 2018 at 1:52:01 PM UTC
Take a look at part three. Line 20 of the first snippet of code determines how long the servo spins.
Sam Storino
March 5, 2018 at 1:52:57 PM UTC
I do not have a video tutorial, but if you give more specifics on where you’re stuck, I’m happy to give some input.
fathsus
March 8, 2018 at 3:45:14 AM UTC
Hi Sam. im a student doing her final year project and im having a problem with the coding as it is my first time using rpi and python. i dont even know if im doing anything right. firstly, ive installed the imapclient successfully. ive created the gmailwrapper.py in the terminal itself (am i right?) but i have no idea how to verify whether it works. how do i ensure that i am in the same directory as the gmailwrapper.py that i have created? and for that remaining code do i type it in the terminal or python itself? thanks, hoping for your reply. great project by the way!
fathsus
March 8, 2018 at 4:37:03 AM UTC
when i want to verify that my gmailwrapper works, it gets stuck at logging in as . what i mean by that is that there isnt the >>> anymore in the next line for me to code? so it cant read ids = gmailWrapper or cant quit(). help?
Sam Storino
March 8, 2018 at 8:27:21 PM UTC
Hey there. It’s a bit difficult to debug without having more information. I suggest taking another careful read through the tutorial ensuring you don’t skip out on any pieces. It sounds like you’re stuck on some of the fundamentals of the environment (linux) and language. Here’s a resource for navigating directories through the terminal to help out: http://linuxcommand.org/lc3_lts0020.php
As for the error you’re receiving, I’m only speculating, but it sounds like the GmailWrapper.py file has an issue which is causing the python interpreter (you’re in the interpreter when you see those >>>) to bail. Double-check what you have compared to what’s in the tutorial. If you’re completely stuck, reach out to open more of a dialog so we don’t bloat the comments.
Chad
April 10, 2018 at 2:24:30 PM UTC
Thank you! Just ordered all the stuff to make this! Looks like I’ll have a project this weekend!
Sam Storino
April 10, 2018 at 8:01:05 PM UTC
Excellent! Enjoy the project Chad, it’s a fun one. If you get stuck, feel free to reach out.
Stefano
June 11, 2018 at 8:46:40 AM UTC
Hello Sam, thank you for this awesome tutorial.
If i use non-continuous servos, what should i change exactly? Make 180 degrees spin and come back?
Thank you!
Sam Storino
June 11, 2018 at 4:56:36 PM UTC
Hey Stefano, thanks for the feedback!
You shouldn’t have to change anything, the code responsible for spinning the motor is already set to stay within 0 and 180 degrees.
Stefano
June 21, 2018 at 11:33:52 AM UTC
Thank you! I am finding some trouble understanding how you tied the servo to the knob, with a reasonable amount of food it gets very hard to turn… do you have any close up pictures that show which servo arms did you use and how you used the zip ties? thank you again!
Sam Storino
June 22, 2018 at 8:06:55 AM UTC
Here’s a closeup: https://i.imgur.com/MPNPdT3.jpg. I squared off the rounded edges of the dispenser knob which made a surface that the zip ties could latch onto. Hope that helps!
Stefano
June 24, 2018 at 3:43:01 AM UTC
Hello Sam, yes that helped a lot. I decided to drill holes instead of cutting the edges and that worked well (both zip ties git).
However what i am finding out is that the weight of the cat food, whose shape seems similar to yours, makes the knob so hard to turn that in my first test i completely destroyed my first servo :(( (some gear inside is now damaged).
So i need to find a way to have fewer food entering the dispenser… mumble mumble..
Thank you again and have a great Sunday!
Sam Storino
June 24, 2018 at 11:08:28 AM UTC
Interesting. I haven’t come across issues with power using the servo in my blog, it outputs a decent amount of torque. Compare the specification of yours to see if yours is way different. I’d also suggest filling the dispenser halfway as a test, if it works that may be a decent enough workaround. You could also tweak the settings so the servo rotates differently (for example, rotate left/ right 5 times instead of 3, like my post has it configured). Alternatively, you could purchase the same servo as me to see if that solves your problems. One thing to make sure is that the servo is really tightly bound to the dispenser knob, otherwise you’ll have too much slack as the servo spins, which won’t allow it to output its full potential.
Tom
July 17, 2018 at 8:31:35 AM UTC
Hello Sam! Thanks for that great idea and howto you created here! My cats are killing me already in the morning 🙂 My question, would a raspberry pi zero be enough? I´m new into the whole Raspberry thing, just want to make sure not to start with the wrong hardware 🙂 Thanks, and have a nice Tuesday!
Sam Storino
July 17, 2018 at 5:42:14 PM UTC
Good to hear my post is a potential solution to your feline problems! The Raspberry Pi Zero is certainly capable of handling this project. It doesn’t come with soldered GPIO pins, however, so you’d either need to add some pin headers yourself or physically solder the servo motor wires to the pins.
Also, unless you have the Zero W, you won’t have built-in wifi. That’s ok though, my Pi didn’t have it either and USB wifi adapters are cheap. I linked to the one I used in the post.
Enjoy the project Tom!
Tom
July 25, 2018 at 2:01:43 AM UTC
Hi again! I found a Pi Zero WH with pre-soldered 40 GPIO pins in our local store, lucky me. It worked out very well, already finished with the first three parts. So software site worked out very well, thanks to the great explanation. Really appreciate that, tanks again for the effort =)
Sam Storino
July 28, 2018 at 12:42:15 PM UTC
That’s awesome Tom, I’m glad the guide is working out for you!
Leo Jerez
October 7, 2018 at 2:41:01 AM UTC
Hey, new to raspberry pi but I do have some background in programming. I’m trying to think of an idea for how to trigger the cat feeder without requiring sending an email. Maybe something that could trigger it a little faster. For scheduling I can just set the cron job to run the servo program itself. But, for manual running of the program, I’m trying to think if there is another way to do it. any thoughts?
David Jeffers (Forte)
December 25, 2018 at 7:39:34 PM UTC
If I wanted to follow this example, but have it triggered with MQTT instead of email, is there anything you’d recommend for someone who will be using this as their first coding/microcontroller project?
Sam Storino
January 9, 2019 at 12:52:28 PM UTC
Hey David,
Apologies for the delay! I haven’t experienced MQTT before, thanks for pointing that to my attention. After some quick poking around it looks like there’s a decent amount of “how to” articles on getting started with MQTT, as well as free sandbox servers that you can use as a message broker. This article had some good information: http://www.steves-internet-guide.com/into-mqtt-python-client/
As for recommendations: fortunately there isn’t too much complex coding going on with this project. The goal is simple: spin a motor when we tell it. It gets a bit more complex when we want the “when we tell it” to be triggered remotely. I went the route of using Email as a quick and dirty solution to this problem which avoided the need to setup a web server and associated services. A more practical and responsive approach would be to introduce a web service. Using the subscriber/ publisher model as you mentioned would be fun to work through, though a message broker may be considered a slightly over-engineered solution (which can be fun!) for something as simple as this, as there’s really not many messages or coordination going on in this project.
I would take this step at a time: Clearly state what it is you’re trying to solve in as general a way as possible. For you, it’s not enough to use email as a solution, you’d like to introduce an alternative approach via MQTT. The first step in my opinion would be to create a simple working example of MQTT, independent of this cat feeder project. This should give you a better understanding of the subscribe/publish model and how that works with MQTT. Once you have a working example, you can evolve that into “when a message is received, spin the motor”, which ties your MQTT example into the cat feeder project. Taking that a step further would be “when a message from any remote source is received, spin the motor”. I don’t have much experience here, but I’d wager you’d want to setup a web service as your entry point into your raspberry pi which triggers an MQTT publish.
I hope that was the type of recommendation you were after. Best of luck!
Sam
Sam Storino
January 9, 2019 at 1:02:03 PM UTC
Hey Leo,
Sorry for getting back to you so late. You could technically speed up the rate at which your email is checked, if a minute is too much of a lag. However, I’m sure there are some restrictions or limitations on the email server for how frequently you can perform a request. In my other project, the “Automated Laser Pointer” (https://storiknow.com/automatic-cat-laser-pointer-toy-using-raspberry-pi-part-four/), I perform a single login to Gmail, then check for the existence of an email every 30 seconds.
If you simply want to get away from using Email altogether, the more practical approach to this problem would be setting up a local web server and introducing a web service. I haven’t used it, but `Flask` comes to mind as a simple web server to get started with: https://projects.raspberrypi.org/en/projects/python-web-server-with-flask
Once the service is up and publicly accessible (and secure!) you’d still need to send a post to it. That’s as simple as navigating to the endpoint via your browser. You could still leverages services like IFTTT to use as an interface to your web service, though.
Hope that helps!
Sam
forte
January 9, 2019 at 2:03:27 PM UTC
I am actually already running a MQTT broker because I’m using Home Assistant (hass.io) for my home automation, but everything I’ve done so far has been just flashing an already existing code that someone else’s written and just configuring it like tasmota on an esp8266, or hass.io itself on the raspberry pi.
and I want to do it over mqtt so that my home automation system can automatically trigger it with my regular home automation stuff.
Sam Storino
January 9, 2019 at 2:53:10 PM UTC
Ohhh, now that’s some pretty slick stuff. I hadn’t thought about integration with a home automation system (I have SmartThings). Since you already have the broker set up it’s really just a matter of setting up your Raspberry Pi as the subscriber, listening for messages by MQTT triggered by your Home Assist, then rotating the motor.
I think I may have misunderstood what you were looking for in your original comment, and at this point you’re likely the better resource from the MQTT side of things. I can’t say I’ll be of much more help, but I’m open to talking things through if you get stuck along the way. Feel free to just shoot me a message through the Contact form to open a dialogue.
Awesome idea, thanks for sharing!
Justin Doiron
February 4, 2019 at 2:04:52 PM UTC
Did you paint the 2″ PVC to match the 3/4″ copper?
Sam Storino
February 4, 2019 at 3:20:48 PM UTC
Yes I did. I went to my local hardware store and picked up copper metallic spray paint.
Seb T
May 28, 2020 at 8:46:59 AM UTC
Greate tutorial !
I’m almost done but I cannot find a way to fix the motor to the dispenser because I can’t find a #8-32 Threaded Rod in France (your link is dead)…
Do you have any idea where I can get some, or alternatives ?
Willem
August 4, 2020 at 9:42:22 AM UTC
Thanks for this great explanation. I have now built something similar using the principles you describe, with some extra’s:
1) Mechanically it is different since I have built it inside a wooden box. It needs to be able to stay outside in our garden (under cover) and feed the cat when we are away for a day.
2) I have trimmed a bit of rubber of the rotating part in the dispenser, to make the turning a bit easier, to create less resistance for the servo.
3) I have added a weigh scale (with a hx711 unit) unit so I can measure how much food is dispensed and make sure a certain minimum is achieved. After 6 turns without dispensing any food, I receive an email warning me that the feeder is empty.
4) I have added a manual push button (doorbell) to enable manual dispensing.
5) In the software I am not only monitoring for emails to feed the cat, but also for a request to measure the amount of food left, or to reset the weigh scale to zero.
6) I added a camera with Motion and Rclone software to take a video when motion is detected and to automatically upload these videos to Google Drive, so I can see what is happening when we are away from home (and whether it is our cat eating the food, or another, or a hedgehog , or….)
I did consider adding software with cat detection (recognising whether it is a cat in front of the feeder) but this OpenCV software was too heavy for the Pi Zero. Going even further, recognising whether it was our black cat instead of the other visiting/competing black cat, would certainly be another ballgame.
Your ideas of using IFTTT and Gmail were really great and a lot of help. This offers great freedom and control when not at home, and also makes the setup very reliable because of the loosely coupled pieces of software. Thanks again,
Willem
Ollie
January 4, 2021 at 7:19:26 PM UTC
Hi Sam,
Cool little project! Going to give it a try – but more importantly – did it improve the feline behaviour? 😂
Aya Halawi
February 28, 2021 at 9:47:30 PM UTC
Hi Willem,
I was wondering if you might share instructions and pictures on how you did number 3) on your list. I have made my own version of this cat feeder (Awesome instructions, thanks Sam!!) and I’m getting unequal amounts of food being dispensed into the bowl.
Sometimes I get a good amount of food and sometimes double or triple that (I think food gets stuck in the pipes every other spin and gets dispensed). I would like to possibly add some sort of element to regulate how much food is getting in so my cat is not getting an overload of food.
If you or anyone has any suggestions, please let me know!
Thanks,
Aya